This is how we do remote shoots with multiple subjects in different locations
It’s a bit of set up to get this working, but this process has worked well for us on many shoots. This is a robust workflow that can handle shoots with important talent, and a lot of agency and clients watching.
Here’s what’s in a standard kit we send off for a shoot.
Hardware:
- MacBook Pro
- iPhone 11 or newer
- iPhone cable + dongles to attach to computer
- USB Hub
- Lav Recording Device (Tascam DR-10L or Zoom F2)
- USB Audio Interface (ATR-2x)
- A long ⅛” to ⅛” cable to go from the USB Audio interface to the Lav recording device
- Lights and mounts of your choice
- Laptop stand
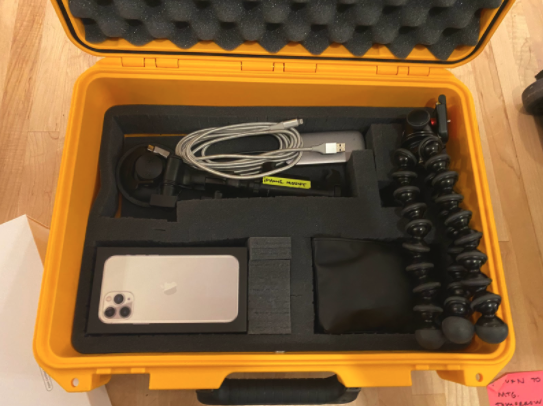
Here's an iPhone kit ready to go.
Software on the Computer:
- Zoom
- OBS Studio
- NDI Virtual Input (part of NDI Tools)
- OBS NDI Tools
- Splashtop Remote Desktop
Software on the iPhone:
- Purchase and install NDI HX Capture
Prep everything so it’s working perfectly before you send the kit. Test it as much as you can. We test everything described below before we send anything to talent.
TEST TEST TEST.
On your control computer: (The computer that stays with you)
- Install Splashtop
- Install Zoom (Ha, of course you’ve already installed Zoom.)
Setting up the remote computer and iPhone: (The one you send to the shoot)
- Disable automatic sleep. System Preferences -> Energy Saver -> Prevent computer from sleeping automatically
- Install Splashtop Streamer. You have to check and make sure it’s working from the control computer computer before you send it out, because sometimes there are hiccups in getting this to work.
- Install Zoom
- Install OBS Studio
- Download and install NDI Virtual Input (If it tells you to install NDI Runtime, do that too)
- Hook up the USB Hub to computer + iPhone to hub so the phone can get a charge
- Install OBS NDI Tools (Install NDI Runtime if it tells you to)
Getting the image from iPhone to Zoom:
- Make sure the iPhone and the remote computer are on the same network
- Run NDI HX Capture and follow the instructions to start broadcasting
If you want to capture and broadcast in the default vertical portrait (9:16 aspect ratio) mode:
- Run NDI Virtual Input
- Select your iPhone.
- On Zoom select NDI Video as your camera. Your iPhone screen should appear
The extra steps necessary if you want capture and broadcast in horizontal landscape (16:9 ratio) mode:
- Run OBS Studio (Go past all the wizard questions)
- Add a source and choose NDI Source
- Double click on the newly added NDI Source and choose your phone
- The phone screen should appear on the canvas of OBS
- Select the phone screen and right (or option) click on it and use transform to rotate the image
- Now you need to export this back out to another NDI source to get it in zoom…
- Select Tools -> NDI Output Settings
- Activate your main or preview output, or both
- Open NDI Virtual Input and select the output source you just created (likely called OBS)
- On Zoom select NDI Video as your camera. Your rotated iphone screen should appear.
Getting sound ready:
- Mount the mic from the Tascam on the talent
- Run a the monitoring cable from the Tascam to the audio interface
- Plug in the interface
- Select the interface as your microphone source in Zoom. You should now be hearing audio from the lav.
Getting ready to record:
- Put the remote computer in place
- Be sure to set the iPhone video settings (4k vs HD, 24 vs 30fps)
- Load up the camera and set to video. I recommend using the higher quality rear facing camera.
- Mount the iPhone
- If there’s another person present during the shoot, it’s worth using AE/AF Lock to prevent focus changed or exposure changes that can ruin the shot
- Make sure your placement and eyelines are good
- Record on iPhone and the lav
Executing
- Pack this all up and sent to the talent
- When they open up the kit, they will need to turn on the computer, connect it to their wifi and set up the phone.
- The rest of the setup and control can be handled by the operator remotely via Splashtop
- When the shoot is done the operator can remotely download the media from the iPhone + Lav recorder and upload it to the service of choice (Dropbox, Frame.io, etc)
What’s great about this setup is that the iPhone is just becoming another camera in Zoom, so it’s possible to send multiple setups to multiple people, and let them have a conversation in a way that feels like a normal zoom call, but still capture it in higher quality 4K.
This is a complex workflow to achieve powerful results.
Note: It’s possible to do this with FiLMiC Pro in a way that is a bit simpler to set up, but we stopped using it because we found that the average person who’s just running the iPhone for one shoot doesn’t want to be bothered to learn FiLMiC. This is much simpler for them.